How to use Ledger Live on mobile: the complete guide
From the moment you set it up, Ledger Live transforms your wallet into a dashboard for your cryptocurrencies . This step-by-step tutorial shows you how to configure , secure, and use all the key features of the mobile app – from the initial Bluetooth connection to staking your first ETH.
Table of contents
How to use Ledger Live: Prerequisites
- A Ledger hardware wallet (Nano X, Flex, Stax (Bluetooth) or Ledger Nano S Plus (OTG cable)). If you don't know where to start, we invite you to visit our detailed comparison to find out which Ledger to choose .
- iOS 15+ or Android 10+ with at least 150MB free for the mobile application .
- The latest Ledger update is 3.65.0 ( official support ).
- An encrypted internet connection (4G/5G or Wi-Fi).
How to use Ledger Live: Install Ledger Live mobile
- From the App Store or Google Play, search for " Ledger Live" and download.
- Open the app, accept the privacy policy.
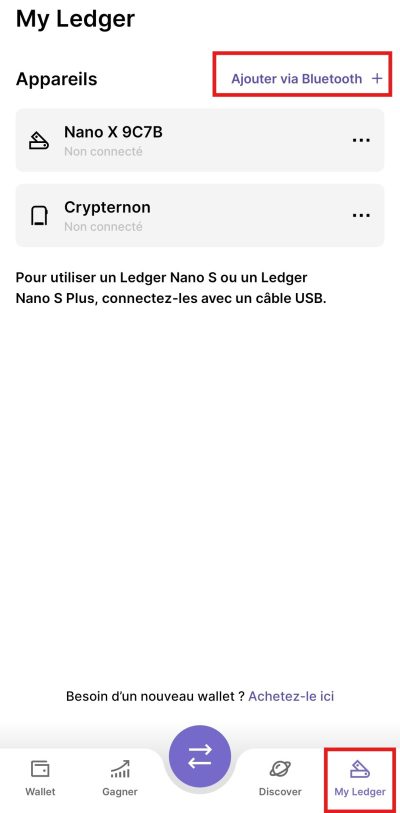
- Go to the "My Ledger " tab and then "add via Bluetooth"
4. Select your key template and then create a new wallet if you don't already have one.
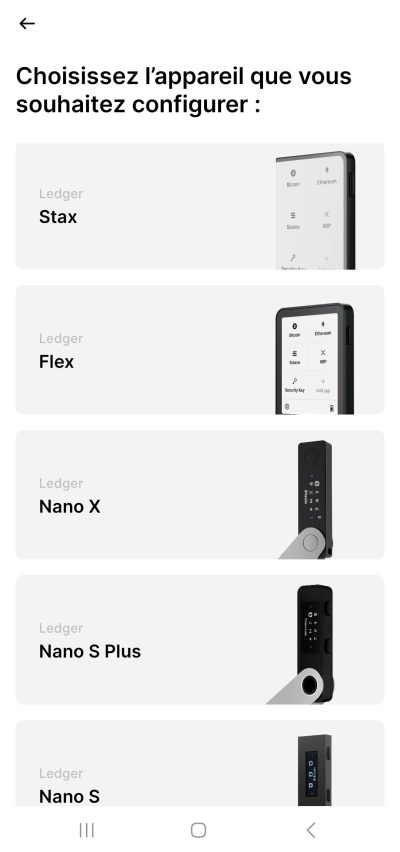
5. Enable Bluetooth or connect the OTG cable.
How to use Ledger Live: First step-by-step setup
1. Create the PIN on the hardware wallet
- Choose 4 to 8 unique digits.
- Avoid sequences (1234) or birth dates.
2. Save the recovery phrase (12 or 24 words)
Record it offline; no screenshots, no cloud storage! Without this backup , your funds are lost.
You have a piece of paper provided by Ledger to write down your seed phrase. Keep this paper in a safe place; you can also make another paper copy.
3. Confirm the secure connection
- The mobile screen displays "Genuine Check"; confirm on the device.
- A green banner confirms authenticity.
How to use Ledger Live: Discover the mobile interface
Ledger Live opens to the Portfolio , followed by five tabs:
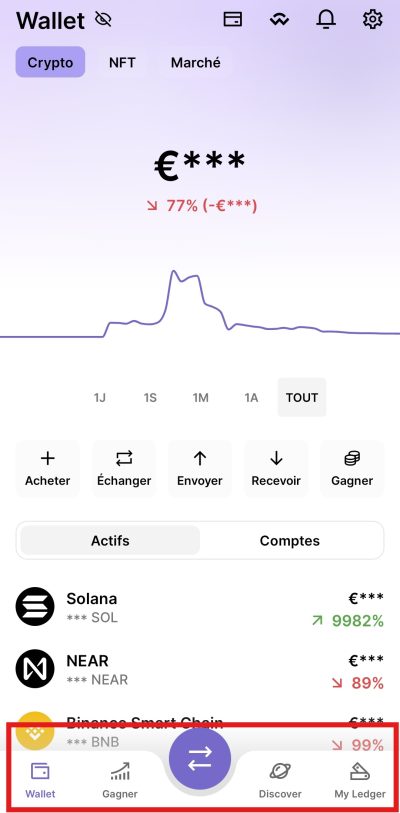
- Wallet : total balance and daily variations.
- Earn : to earn interest on your cryptocurrencies, particularly through staking .
- Transfer: receiving, sending transactions, buying, selling or swapping cryptocurrencies.
- Discover: quick access to DeFi dApp and NFTs .
- MyLedger : to manage the connection of your device(s).
You also have access in the top right corner to the Ledgercard, Wallet Connect (a service facilitating connection to DApp), your notifications and your settings.
Understanding how Ledger wallets and apps work
A Ledger is a hardware wallet . Unlike a software wallet like MetaMask, it stores your private keys offline, directly on a secure chip. This drastically reduces the risk of hacking, even if your smartphone is compromised.
However, at startup, your Ledger doesn't contain any blockchain applications . Therefore, it can't interact with any network like Bitcoin , Ethereum , or Solana . You must first install the blockchain apps specific to each cryptocurrency you want to use.
Each application serves as an interface between your Ledger and a given blockchain. For example:
- The Bitcoin allows you to generate addresses compatible with the BTC and to sign transactions with the correct format (SegWit, Taproot, etc.).
- The Ethereum provides access to ERC-20 compatible addresses and interactions with smart contract contracts .
- Solana app is essential for interacting with SPL tokens or staking staking this network.
Add your first crypto account
Here's how to proceed step by step to add an account on Ledger Live mobile, once the blockchain application is installed on the Ledger.
- From the Wallet , tap Accounts.
- Select " Add an account ".
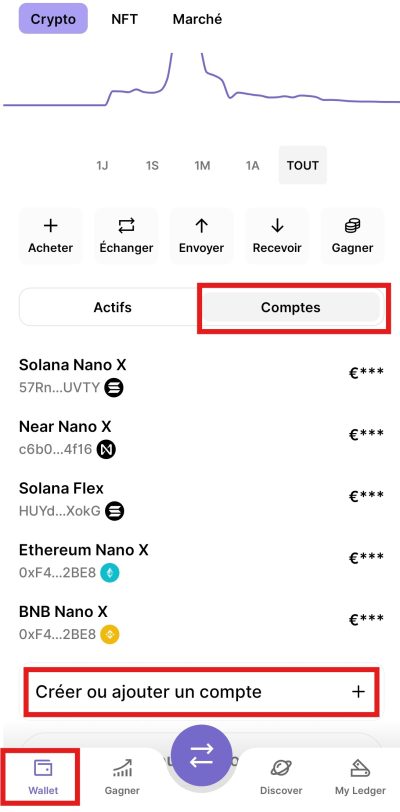
3. Choose the asset that corresponds to the installed application (for example, Bitcoin or Ethereum ).
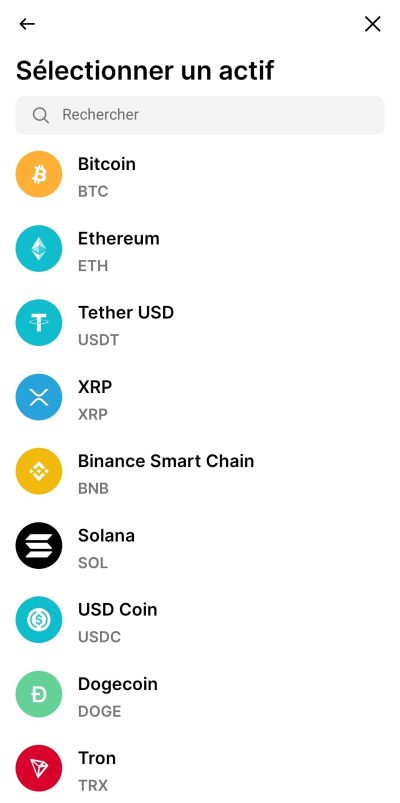
4. Ledger Live now asks you to connect and unlock your device .
5. Manually open the relevant application on your Ledger (example: press both buttons to open " Ethereum ").
6. Ledger Live synchronizes with the blockchain and detects available addresses.
7. A default account is provided; you can add more per asset if necessary.
8. Validate the account; it will now appear in your "Assets" tab.
How to use Ledger Live: Receiving funds
To receive crypto assets, you need to generate a public address linked to one of your accounts. Here's how to do it on the mobile app.
- Go to the Wallet or " Transfer " tab and then tap " Receive ".
- Select the crypto account to which you wish to receive funds (e.g., Ethereum).
- Ledger Live displays a QR Code and an alphanumeric address .
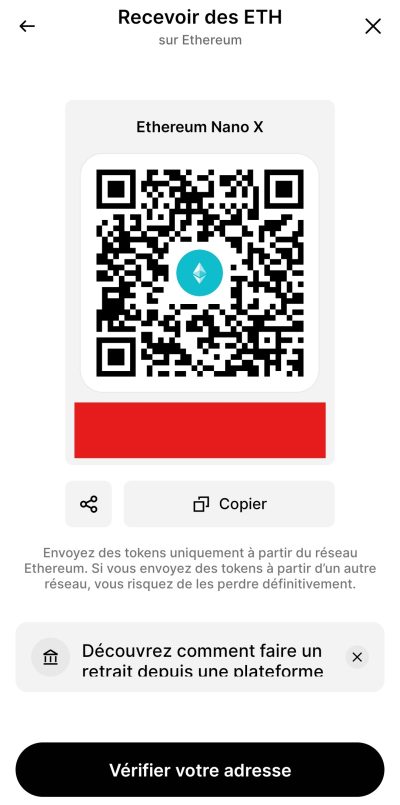
4. Connect your Ledger, open the corresponding application and verify that the address displayed on your phone matches the one on the Ledgerscreen.
5. Once confirmed, you can share this address (or the QR code) to receive the funds.
Important : You can only receive funds of the same type as the selected account. Never send BTC to an Ethereum , for example.
How to use Ledger Live: Send funds
To send crypto from your Ledger, you need to sign the transaction with your device. Here are the detailed steps:
- From the " Transfer " tab, tap " Send ".
- Choose the asset (e.g., Bitcoin) and then the sending account.
- Enter the recipient's address manually or scan their QR code.
- Indicate the amount to send.
- Choose the network charges :
- "Economy": cheaper, but slower.
- "Standard": recommended for a good balance of speed and price.
- "Fast": priority but expensive.
- Connect and unlock your Ledger, then open the relevant app (e.g., Bitcoin).
- Confirm the transaction on the Ledger screen by verifying all the details (amount, address, fees).
- Once signed, the shipment is broadcast on the blockchain and you can track its status live.
Thanks to this offline signature , your private keys never leave the device. Even if malware is installed on your mobile, it will not be able to initiate a transaction without physical validation on the Ledger .
Summary of key concepts
- A Ledger does not contain any apps by default : you must install them manually.
- Each blockchain requires its own app.
- accounts are added after the apps are installed, via Ledger Ledger .
- Receiving funds does not require a signature, but sending them requires physical validation on the device.
This strict separation between private keys (in the Ledger), display (in Ledger Live) and blockchains (online) is what makes the system so robust.
How to use Ledger Live: Advanced features to go further
Once your initial accounts are set up, Ledger Live mobile offers more advanced features than simple wallet management. Here's how to take advantage of these advanced functions while maintaining a high level of security .
Exchange your tokens with the built-in swap
The " Swap " tab allows you to instantly exchange one token for another, without having to go through an external platform. Ledger Live integrates several liquidity aggregators Changelly and Paraswap .
In practical terms, here's how to proceed:
- Go to the "Exchange" tab from Wallet or Transfer in the bottom bar.
- Choose the asset to exchange (e.g., Ethereum ) and the one you wish to obtain (e.g., USDC ).
- Enter the amount to be converted, then select the source account and the destination account.
- An overview of the rate and network charges is displayed. Confirm.
- Connect your Ledger to sign the exchange transaction. The cryptographic signature is done just like for a regular transaction.
Your private keys are never sent online; everything happens locally via the Ledger , guaranteeing complete protection of your funds. The transaction is then automatically broadcast on the blockchain.
Direct and secure Staking
Since early 2024, Ledger Live mobile has allowed you to stake your assets directly from the app, without using a dApp . This allows you to generate passive income on your cryptocurrencies while retaining full control of your private keys.
Currently, supported assets for staking include Ethereum (ETH) , Polkadot (DOT) , Cosmos (ATOM) , and Tezos (XTZ) . For ETH, several validators are available, including Coinbase , Kelp Dao , and Lido. To learn more, please see our dedicated article on staking .
Here's how to stake your tokens step by step:
- Go to the " Earn " tab (coin icon or upward arrow).
- Select the asset you wish to stake (e.g., ETH).
- Choose a validator or accept the one offered by default ( Ledger displays names, commission rates and estimated returns).
- Specify the amount to stake (you can start with fractions of ETH).
- Connect your Ledger to staking transaction .
Rewards are calculated automatically by the blockchain and displayed directly in the "Portfolio" tab. On Ethereum , earnings are automatically compounded every 24 hours, progressively increasing the staked amount, unless a manual withdrawal is made .
Track your NFTs in Ledger Live
Ledger Live supports viewing your NFTs Ethereum (ERC-721 and ERC-1155) and Solana (SPL) blockchains . This allows you to track your digital assets without using a third-party site like OpenSea.
Important note: metadata and images are loaded locally or from IPFS gateways, but no private data is transmitted to Ledger or any third-party server. Your NFTs are only visible if you have added a compatible account (ETH or SOL).
- Add an Ethereum or Solana account if you haven't already done so.
- Go to the "Portfolio" menu > select the asset > tap "NFT".
- The visuals, titles, and identifiers of your NFTs are displayed. You can view them, but you cannot yet transfer them directly from the app (this feature is planned).
Connecting to dAppvia WalletConnect 2.0
Ledger Live now integrates version 2.0 of WalletConnect , a secure protocol allowing you to connect your wallet to decentralized applications ( dApp ) such as Uniswap , Aave , Compound , PoolTogether and many others.
Here's how to interact with a dApp from your Ledger mobile device:
- Open the dApp website on your mobile or PC browser.
- Click on “Connect wallet” and choose “WalletConnect”.
- A QR code will appear. On mobile, click "Copy to clipboard" or scan from another device.
- In Ledger Live, go to "Discover" > "WalletConnect" > tap "New" and paste the link or scan.
- Confirm the connection on your Ledger . Once connected, you can securely sign DeFi transactions from your Ledger
Ledger Live acts as a secure interface between you and the smart contract . You never sign anything without seeing every detail on your physical device.
Conclusion on how to use Ledger Live
In less than ten minutes, you can install, secure, and get to grips with Ledger Live. Thanks to its frequent updates, compatibility DeFi features , the application remains one of the most robust solutions for managing your digital assets.
Cryptocurrency investments are risky. Crypternon cannot be held liable, directly or indirectly, for any damage or loss resulting from the use of any product or service mentioned in this article. Readers should conduct their own research before taking any action and only invest within their financial means. Past performance is not indicative of future results. This article does not constitute investment advice .
Certain links of this article are sponsorship links, which means that if you buy a product or you register via these links, we will collect a commission on the part of the sponsored company. These commissions do not train any additional cost for you as a user and certain sponsorships allow you to access promotions.
AMF recommendations. There is no guaranteed high yield, a product with high performance potential implies a high risk. This risk taking must be in line with your project, your investment horizon and your ability to lose part of this savings. Do not invest if you are not ready to lose all or part of your capital.
All our articles are subject to a rigorous verification of the facts. Each key information is verified manually from reliable and recognized sources. When we cite a source, the link is systematically integrated into the text and highlighted by a different color, in order to guarantee transparency and allow the reader to consult the original documents directly.
To go further, read our pages legal notices , privacy policy and general conditions of use .

