Easy
How to use Trezor Safe 5: a step-by-step guide to securing your cryptocurrencies
Have you just purchased a Trezor Safe 5 or are you considering getting one to protect your cryptocurrencies ? You've come to the right place. This guide shows you how to use a Trezor wallet, from your first login to managing your digital assets. If this tutorial isn't enough and you'd like dedicated assistance, Trezor offers a support session with a Trezor to configure your wallet from start to finish.
Table of contents
How to use Trezor : What you need before you begin
Before configuring your Trezor Safe 5, prepare the following items:
- A computer (Windows, macOS or Linux) or an Android smartphone
- A recent browser (Chrome or Brave recommended)
- The wallet and its accessories
- A stable internet connection

How to use Trezor : Step 1 – Connect your Trezor Safe 5 to the computer
Connect your wallet using the USB-C cable. The device will automatically power on once connected. You will see a message prompting you to visit the official website to begin the installation.
Go to : trezor
You will be redirected to the download page for Trezor Suite , the official software for managing your portfolio. Download and install it on your computer.
How to use Trezor : Step 2 – Install and connect Trezor Suite
Trezor Suite is the official software for managing your cryptocurrencies with a Trezor . It allows you to send and receive funds, add accounts, manage your seed, and configure device security.
- Launch Trezor Suite
Connecting the wallet to the software
Once Trezor Suite is launched, connect your Trezor Safe 5 to your computer using the USB-C cable. On the wallet screen, you will need to confirm the connection authorization with the software. This step is crucial: it secures the communication between your physical device and the software application.
- A message appears on the Safe 5 screen asking if you trust the computer
- Tap "Confirm" directly on the wallet's touchscreen
This validation is necessary to prevent malicious software from attempting to access the device without your explicit consent.
If Trezor Suite does not recognize your device:
- Make sure you have properly authorized the connection on Safe 5
- Check that the USB cable is working (avoid cables that are only rechargeable)
- Try a different USB port or restart the application
- Install the Trezor bridge if necessary (on some systems, required for communication).
How to use Trezor : Step 3 – Update the firmware
If your Safe 5 firmware is not up to date, Trezor Suite will automatically prompt you to update it. It is essential to always use the latest version to benefit from the latest security patches.
Tip: Never unplug the wallet during an update.
How to use Trezor : Step 4 – Create your wallet
Once the firmware is updated, click on "Create a new wallet". You have two options:
- Classic seed : recovery phrase of 12, 20 or 24 words
- Shamir Backup : splitting the seed into several parts (e.g., 3 out of 5)
Which method should I choose?
- The classic seed is simpler to manage
- Shamir Backup is safer, especially for large sums of money.
Write your words manually on the provided card. Do not photograph them. Do not store them online.
How to use Trezor : Step 5 – Configure security
You now need to set a PIN code on your device. You will be asked for this code each time you plug it in. You can also enable:
- A passphrase : a secret password that generates a hidden wallet
- PIN encryption via microSD card : Safe 5 becomes unusable without the card inserted.

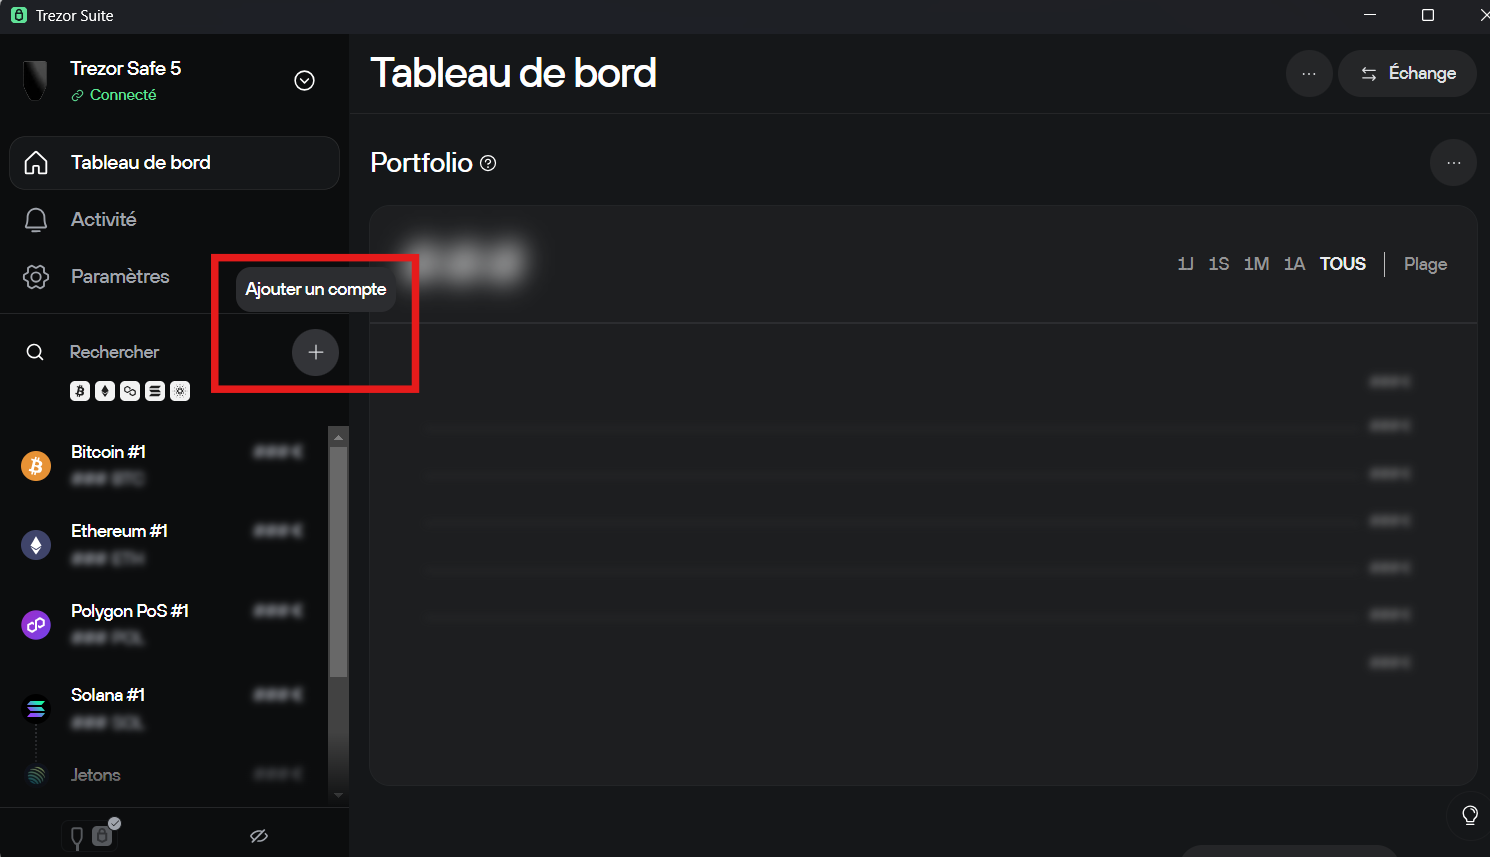
How to use Trezor : Step 6 – Add cryptocurrencies
You can now add accounts for different cryptocurrencies:
- Bitcoin (BTC)
- Ethereum (ETH)
- Solana (SOL)
- Cardano (ADA)
- XRP, Polkadot, Litecoin, etc.
In Trezor Suite, click "Add an account", choose the blockchain, and wait for synchronization. Your public address will be displayed.
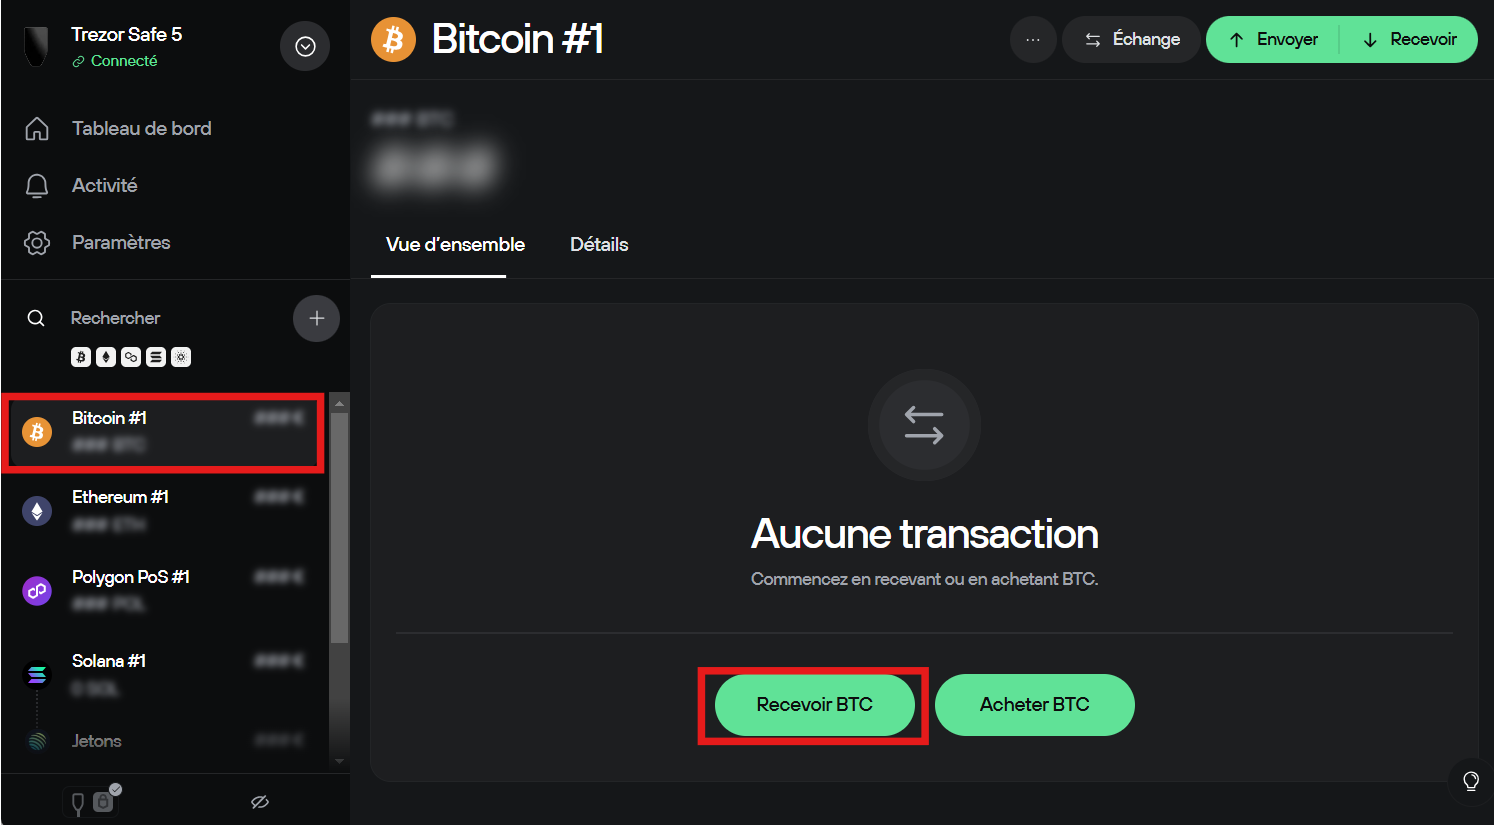
How to use Trezor : Step 7 – Receive funds
To receive cryptocurrency:
- Select the relevant cryptocurrency in Trezor Suite
- Click on "Receive"
- Check that the address displayed on the screen matches the one on the Safe 5
Copy the address or scan the QR code. Never transfer funds without this cross-verification.
Suggested screenshot: address confirmation screen on the Safe 5

Step 8 – Send a transaction
To send funds:
- Go to the "Send" tab of the relevant account
- Enter the recipient's address, the amount, and the fees
- Confirm the transaction on Trezor Suite
- Then confirm directly on the Safe 5 screen
Each detail (amount, address, network) is displayed on the wallet for validation.
Step 9 – Manage your settings and updates
In Trezor Suite, you can access several settings:
- Change the PIN
- Enable or disable the passphrase
- firmware updates
- Change the device name
All these options can be accessed from the "Settings" tab, then "Application" or "Device"
How to use Trezor : Advanced features to explore
Beyond standard sending and receiving operations, the Trezor Safe 5 enables several advanced features. These are aimed at users who want to interact with DeFi , customize their security , or automate actions via external tools.
- Connecting to MetaMask : You can connect your Trezor just a few clicks via the “Connect a hardware wallet” section in MetaMask. This allows you to sign transactions on dApp ( Uniswap , Aave , OpenSea, etc.) while keeping your private keys stored in Safe 5.
- Message signing : Trezor Suite allows you to manually sign a message with your Bitcoin or Ethereum KYC verification , authentication, or participation in an airdrop ). You will find this feature in the “Accounts” > “More” > “Sign a message” tab.
- Staking via Trezor Suite or third-party applications: Trezor Safe 5 now allows you to stake certain assets directly from Trezor Suite , including Ethereum (ETH) , Cardano (ADA) , and Solana (SOL) , thanks to integrations with providers like Everstake. This allows you to delegate your tokens without ever exposing your private keys .
For other assets not yet supported in Trezor Suite, such as Tezos (XTZ) , Polkadot (DOT) , or Cosmos (ATOM) , you can use compatible third-party interfaces (for example, Adalite for Cardano , Polkadot for DOT, or Kukai for Tezos ). In these cases, Safe 5 acts as a secure signature layer, interacting with the application without ever disclosing your private key .
These features are optional but powerful, especially if you use the wallet for more than just long-term storage.
Practical safety tips
- Never leave your seed exposed or in a photo
- Never share your screen during a sensitive operation
- Do not connect your wallet to an unsecured device
In summary: how to use Trezor Safe 5?
Setting up and using a Trezor hardware wallet is simple if you follow the steps in order:
- Plug it in, install Trezor Suite
- Generate your seed, configure a PIN code
- Add crypto accounts and test your first transfer
- Activate additional security features as needed
For detailed guidance with an advisor, visit Trezor's onboarding.
With good digital hygiene and the options offered by Safe 5, you have a secure environment, compatible with more than 8,000 digital assets , and adaptable to daily or professional use.
Cryptocurrency investments are risky. Crypternon cannot be held liable, directly or indirectly, for any damage or loss resulting from the use of any product or service mentioned in this article. Readers should conduct their own research before taking any action and only invest within their financial means. Past performance is not indicative of future results. This article does not constitute investment advice .
Certain links of this article are sponsorship links, which means that if you buy a product or you register via these links, we will collect a commission on the part of the sponsored company. These commissions do not train any additional cost for you as a user and certain sponsorships allow you to access promotions.
AMF recommendations. There is no guaranteed high yield, a product with high performance potential implies a high risk. This risk taking must be in line with your project, your investment horizon and your ability to lose part of this savings. Do not invest if you are not ready to lose all or part of your capital.
All our articles are subject to a rigorous verification of the facts. Each key information is verified manually from reliable and recognized sources. When we cite a source, the link is systematically integrated into the text and highlighted by a different color, in order to guarantee transparency and allow the reader to consult the original documents directly.
To go further, read our pages legal notices , privacy policy and general conditions of use .

Yoann
Training engineer, I quickly became interested in the field of finance. Convinced that decentralized finance has a bright future ahead of it, I participate in its democratization by developing Crypternon.